> For the complete documentation index, see [llms.txt](https://cube.ewelink.cc/llms.txt). Markdown versions of documentation pages are available by appending `.md` to page URLs; this page is available as [Markdown](https://cube.ewelink.cc/english-th/getting-started/add-devices/matter.md).
# อุปกรณ์ Matter (เบต้า)
CUBE OS มีฟีเจอร์ Matter Hub (Controller) ในตัว ช่วยให้คุณสามารถเพิ่มอุปกรณ์ Matter ที่รองรับเข้าสู่บ้านของคุณได้แบบท้องถิ่น
{% hint style="info" %}
สำหรับความเข้ากันได้ ให้ตรวจสอบที่ **อุปกรณ์เสริมที่รองรับ** [บทความ](/english-th/compatibility-check/matter.md).
{% endhint %}
## 1. สำหรับอุปกรณ์ใหม่/รีเซ็ตจากโรงงาน
{% stepper %}
{% step %}
### ค้นหารหัสการตั้งค่า (Onboarding Code)
ค้นหารหัส onboarding ของ Matter บนผลิตภัณฑ์ บรรจุภัณฑ์ หรือคู่มือของคุณ จะมีลักษณะคล้ายตัวอย่างที่แสดงด้านล่าง:
*เครดิต: Connectivity Standards Alliance*
{% hint style="info" %}
อุปกรณ์บางรุ่นต้องจับคู่กับแอปเฉพาะก่อนเพื่อให้สร้างรหัส
ตัวอย่างเช่น รุ่นเก่าของ Wiz และบริดจ์ Matter ส่วนใหญ่ต้องทำขั้นตอนนี้ ในกรณีดังกล่าว ให้ปฏิบัติตามคำแนะนำของผู้จำหน่ายเพื่อรับรหัส Onboarding ของ Matter
{% endhint %}
{% endstep %}
{% step %}
ไปที่หน้าหลัก CUBE OS ของคุณ

คลิกที่ `+` ปุ่ม แล้วเลือก `เพิ่มอุปกรณ์`.
{% endstep %}
{% step %}
### 3.1 ตัวเลือกอัตโนมัติ
เปิดอุปกรณ์ Matter ของคุณและตรวจว่าอยู่ในโหมดจับคู่ตามคำแนะนำของผู้ผลิต จากนั้นคลิก `เริ่มการตั้งค่า`.
อุปกรณ์ที่พร้อมใช้งานจะแสดงรายการบนอินเทอร์เฟซนี้ เลือกอุปกรณ์ที่คุณต้องการเพิ่ม
### 3.2 ตัวเลือกด้วยตนเอง
คลิก `เพิ่มอุปกรณ์ Matter`
{% endstep %}
{% step %}
ป้อนรหัส onboarding ของอุปกรณ์ที่คุณได้รับจาก [ขั้นตอนที่ 1](#for-new-factory-reset-devices).
{% endstep %}
{% step %}
กรอกข้อมูลรับรอง Wi‑Fi ของคุณหากมีการขอให้ทำเช่นนั้น
จากนั้นคลิก `ถัดไป`.
{% endstep %}
{% step %}
CUBE OS จะเริ่มสื่อสารกับอุปกรณ์ของคุณเพื่อการตั้งค่า
{% endstep %}
{% step %}
เมื่อเสร็จสิ้นการเพิ่มอุปกรณ์ CUBE OS จะขึ้นหน้าต่างเพื่อให้คุณตั้งชื่อและกำหนดให้กับห้อง
{% endstep %}
{% endstepper %}
## 2. สำหรับอุปกรณ์จากแอปอื่นๆ
สำหรับอุปกรณ์ Matter ที่กำลังใช้งาน ให้ทำตามขั้นตอนเหล่านี้เพื่อเปิดการจับคู่และรับรหัส onboarding:
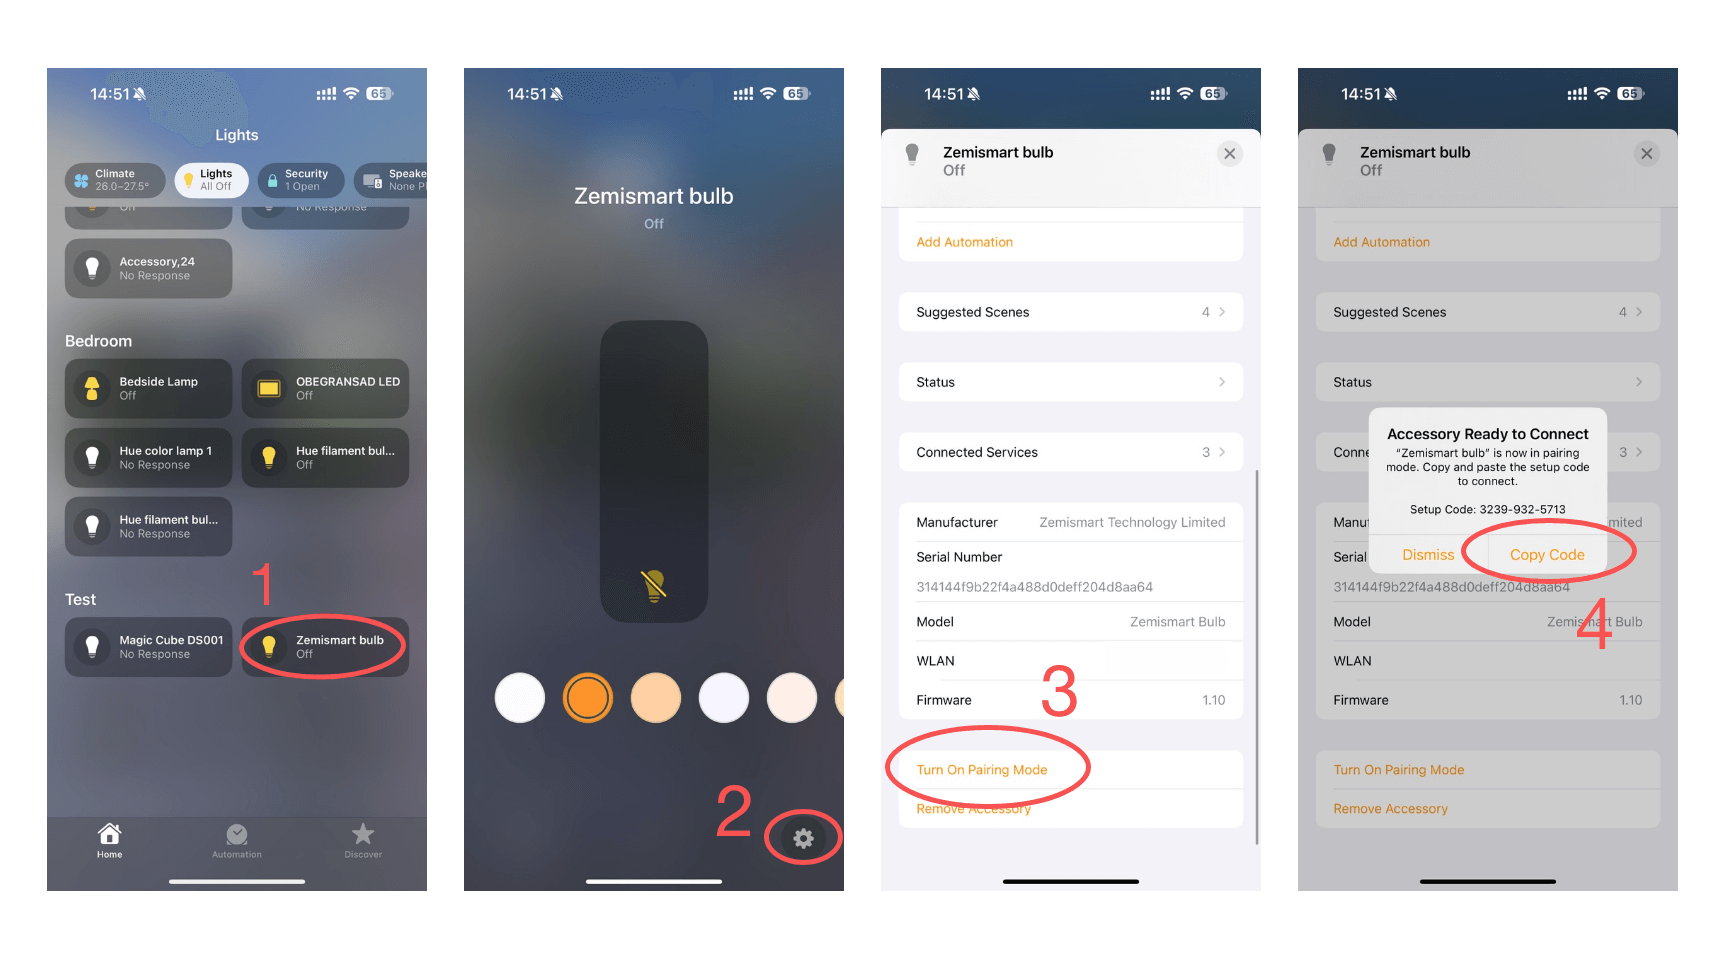
### **2.1 Apple Home**
#### **2.1.1 อุปกรณ์ Matter แบบเนทีฟ (เช่น ปลั๊ก Wi‑Fi แบบ Matter)**
{% stepper %}
{% step %}
เปิดแอป Home และค้นหาไทล์ของอุปกรณ์ที่คุณต้องการแชร์
{% endstep %}
{% step %}
เปิดแผงควบคุมของอุปกรณ์แล้วแตะไอคอนรูปเฟือง
{% endstep %}
{% step %}
ในหน้าการตั้งค่าอุปกรณ์ เลื่อนลงไปด้านล่างแล้วแตะ “เปิดโหมดจับคู่”
{% endstep %}
{% step %}
คัดลอกรหัสและทำตามคำแนะนำการจับคู่บนหน้าของ CUBE OS
{% endstep %}
{% endstepper %}
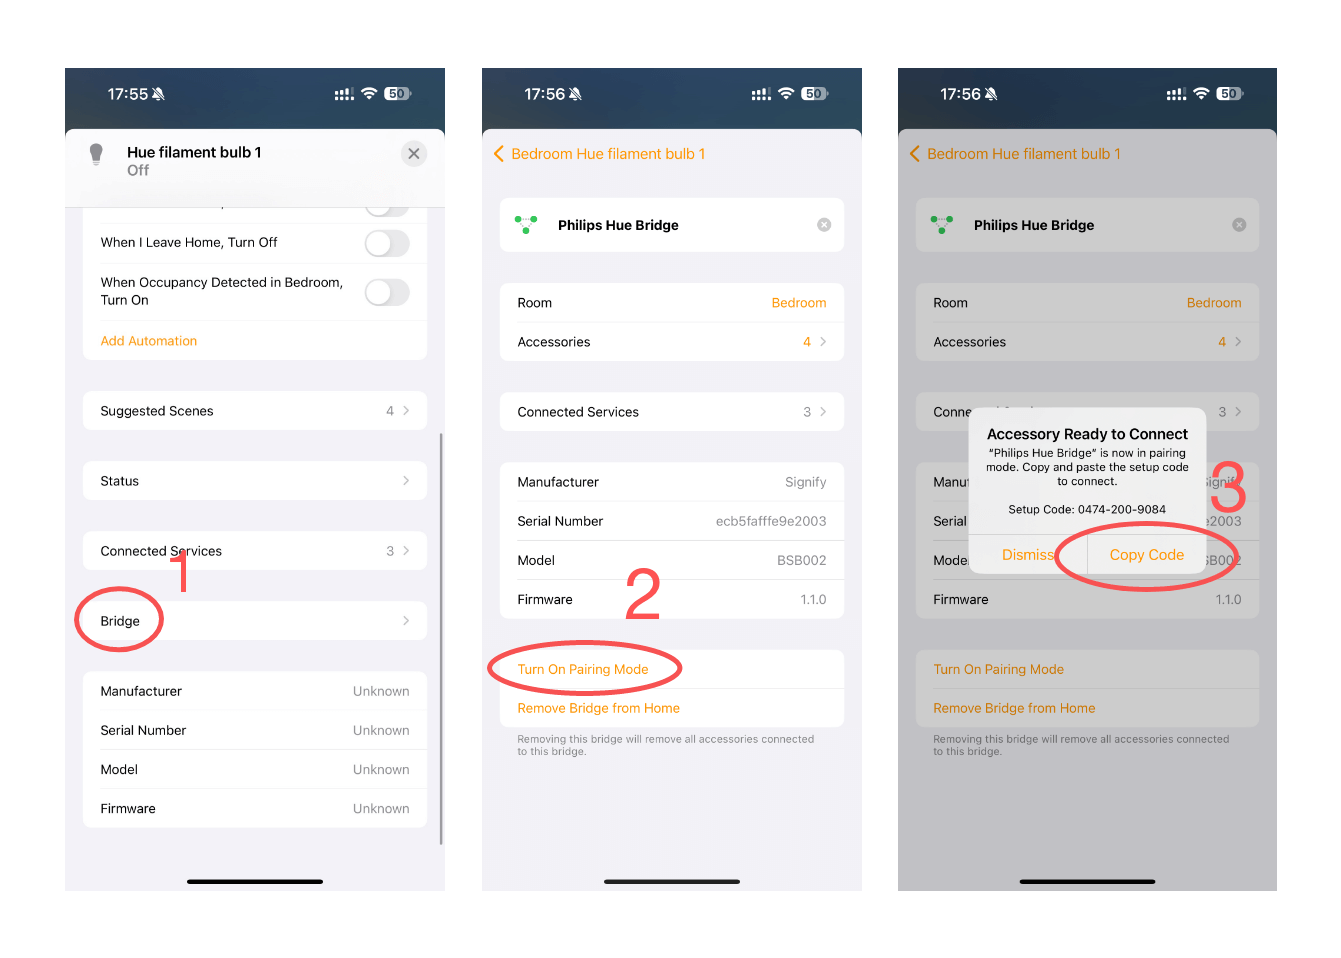
#### **2.1.2 สำหรับอุปกรณ์ที่เชื่อมผ่านบริดจ์ เช่น *****หลอดไฟ Philips Hue พร้อม Hue Bridge*****:**
{% stepper %}
{% step %}
เปิดแอป Home และค้นหาไทล์ของอุปกรณ์ที่คุณต้องการแชร์
{% endstep %}
{% step %}
เปิดแผงควบคุมของอุปกรณ์แล้วแตะไอคอนรูปเฟือง
{% endstep %}
{% step %}
ใน **หน้าการตั้งค่าอุปกรณ์** ให้ **เลื่อนลง** ไปที่ “**บริดจ์**” แล้วแตะ
{% endstep %}
{% step %}
จะนำคุณไปยังหน้าการตั้งค่าของบริดจ์ที่เชื่อมต่ออุปกรณ์ของคุณ เลื่อนลงไปด้านล่างแล้วแตะ “เปิดโหมดจับคู่”
{% endstep %}
{% step %}
คัดลอกรหัสและทำตามคำแนะนำการจับคู่บนหน้าของ CUBE OS
{% endstep %}
{% endstepper %}
{% hint style="info" %}
โปรดทราบ: วิธีนี้จะนำอุปกรณ์ที่รองรับทั้งหมดที่แนบกับบริดจ์เข้ามาใน CUBE OS ของคุณ
{% endhint %}
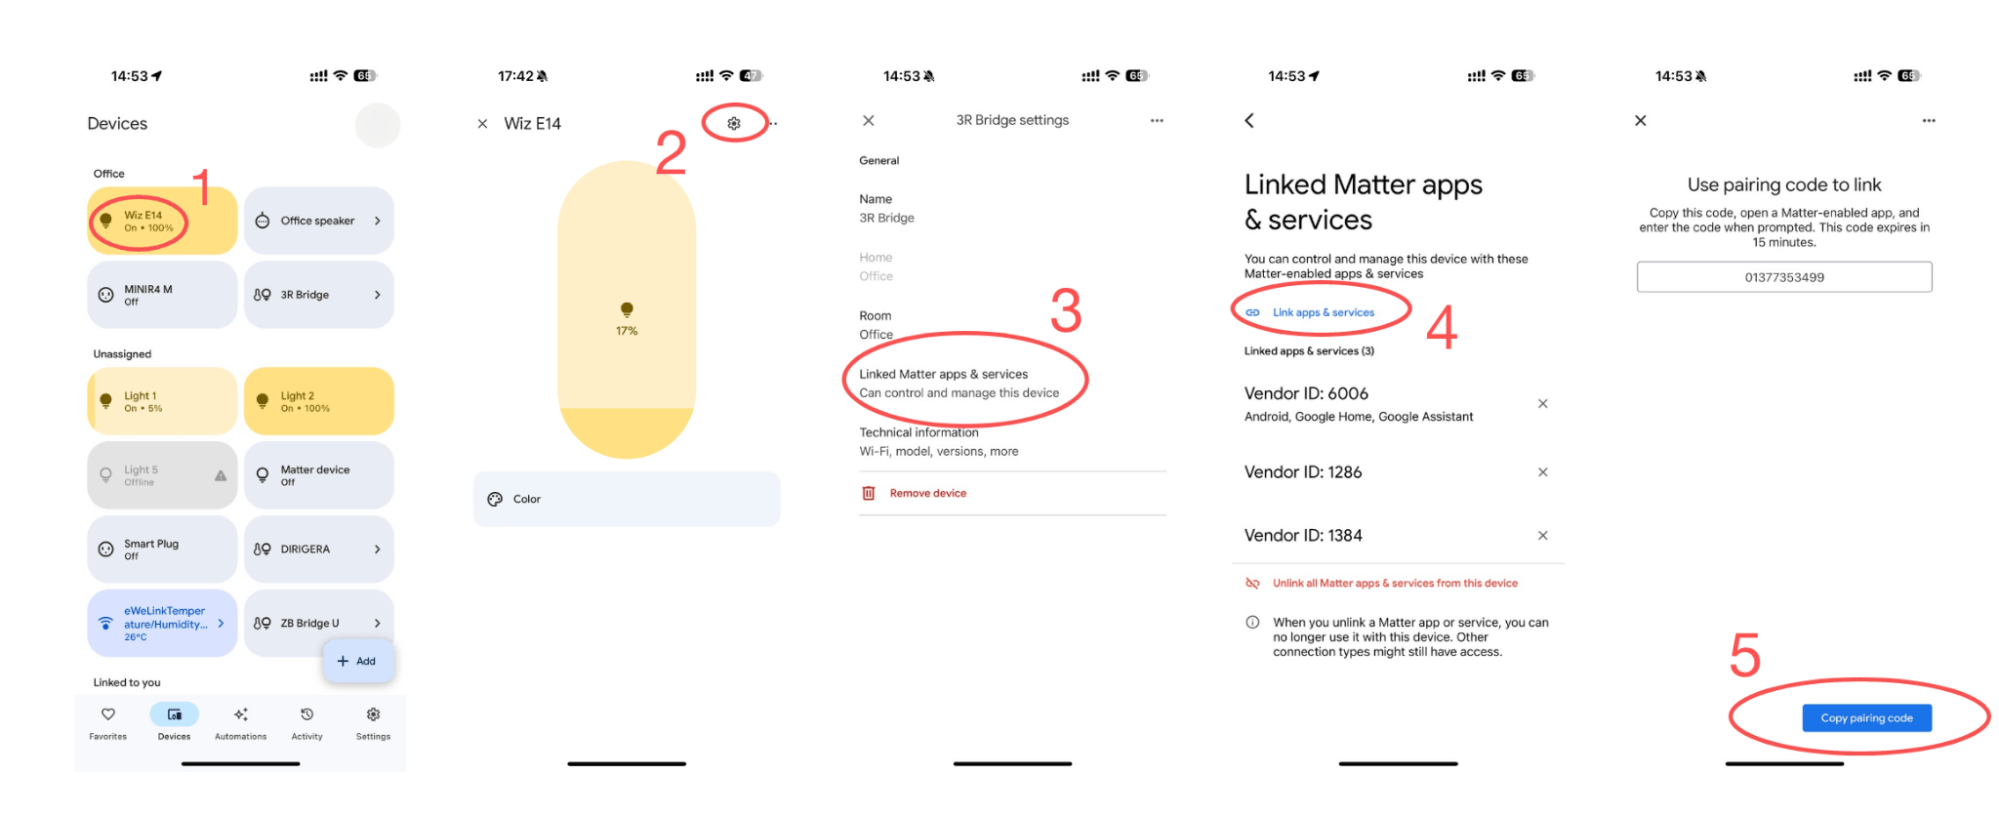
### **2.2 Google Home**
#### **2.2.1 อุปกรณ์ Matter แบบเนทีฟ (เช่น ปลั๊ก Wi‑Fi แบบ Matter)**
{% stepper %}
{% step %}
เปิดแอป Google Home
{% endstep %}
{% step %}
เลือกอุปกรณ์ที่คุณต้องการเพิ่มไปยัง eWeLink
{% endstep %}
{% step %}
แตะไอคอนรูปเฟืองเพื่อไปยังหน้าการตั้งค่า
{% endstep %}
{% step %}
แตะ “แอป & บริการ Matter ที่เชื่อมโยง”
{% endstep %}
{% step %}
รอให้โหลดแล้วกด “เชื่อมโยงแอป & บริการ Matter”
{% endstep %}
{% step %}
คัดลอกรหัสและทำตามคำแนะนำการจับคู่ในแอป eWeLink
{% endstep %}
{% endstepper %}
#### **2.2.2 สำหรับอุปกรณ์ที่เชื่อมผ่านบริดจ์ เช่น *****หลอดไฟ Philips Hue พร้อม Hue Bridge*****:**
สำหรับอุปกรณ์ที่เชื่อมผ่านบริดจ์ ขั้นตอนจะเหมือนกับในส่วนด้านบน
### **2.3 Alexa & SmartThings**
Alexa และ SmartThings มีคำแนะนำอย่างเป็นทางการให้ปฏิบัติตาม:
[วิธีการตั้งค่าอุปกรณ์ Matter ที่เชื่อมต่อกับ Alexa ด้วยผู้ช่วยอีกคนหนึ่ง](https://www.amazon.com/gp/help/customer/display.html?nodeId=T6iLWTtbZygaBJnQhg)
[การผสานรวม SmartThings x Matter](https://support.smartthings.com/hc/en-us/articles/11219700390804-SmartThings-x-Matter-Integration)
---
# Agent Instructions
This documentation is published with GitBook. GitBook is the documentation platform designed so that both humans and AI agents can read, navigate, and reason over technical content effectively. Learn more at gitbook.com.
## Querying This Documentation
If you need additional information that is not directly available in this page, you can query the documentation dynamically by asking a question.
Perform an HTTP GET request on the current page URL with the `ask` query parameter, and the optional `goal` query parameter:
```
GET https://cube.ewelink.cc/english-th/getting-started/add-devices/matter.md?ask=&goal=
```
`ask` is the immediate question: it should be specific, self-contained, and written in natural language.
`goal` is optional and describes the broader end goal you are ultimately trying to accomplish on behalf of the user. GitBook uses it to tailor the answer towards what is most useful for that goal.
The response will contain a direct answer to the question and relevant excerpts and sources from the documentation.
Use this mechanism when the answer is not explicitly present in the current page, you need clarification or additional context, or you want to retrieve related documentation sections.